
Photo
OS X Photos App Set Up
14/04/15 18:00 Filed in: Technology
I decided it might help to do a walk through of the set up process to show you what it looks like to do the transfer from Aperture to the Photos App. I have found that seeing how it works can sometimes ease our own concerns about it so the screencast below is a walk through of the set up process. I will probably do other screencasts on the interface going forward so stay tuned. So far I have found the photos app to be helpful for your personal photos especially if you choose to use the iCloud Photo Library option. If you have a large library, be prepared to pay for more storage though. I hope you enjoy the video. Let me know if you have any questions or comments.


Comments
My New SmugMug Portolio Site
28/12/14 15:41 Filed in: Photography
So over the weekend I put together my Portfolio website with all of my latest photos. Now when you click the gallery link you will be taken to my new SmugMug Gallery and will be able to browse all my latest photos. I hope to spend more time capturing my favorite subject: landscapes.
You can view my new site HERE.
I hope you enjoy all the photos! Let me know what you think when you get a chance to check them out!
Moving From Aperture Part 3: Aperture vs Lightroom
14/08/14 07:35 Filed in: Technology

In this screencast I walk you through where things are in Lightroom for those of you coming from Aperture. I cover how each covers photo management, photo editing, and other features. Hopefully this screencast will help familiarize you with Lightroom so you can pick up where you left off.
If you have any questions or comments feel free to leave them here or on my Youtube Channel.
Moving From Aperture Part 2: Import to Lightroom 5
08/08/14 07:13 Filed in: Technology
Adobe made waves lately with moving all of their applications to a monthly fee model instead of the traditional pay to own model of using their software. The logic is that they will be able to issue updates more frequently and it will be cheaper in the long run, especially for those who use Photoshop. One of the offerings Adobe has is a photographers bundle where you get Lightroom and Photoshop for $9.99 a month. When compared to the $149 price tag for Lightroom right now and the usual $79 upgrade price, with Photoshop thrown in, makes this a decent deal. Add in Lightroom Mobile and it seems like Adobe has put together a pretty good solution for photographers.
Lightroom 5 comes with a 30 day trial and will read the metadata that was exported through the Exporter for Aperture application which makes it easy to try out Lightroom to see if it is for you. In this tutorial I cover how to import your library into Lightroom 5. I also cover a few of the differences in how Aperture and Lightroom handle photo management. If you have any questions or comments feel free to leave them below or on my Youtube Channel.
Moving From Aperture Part 1: Exporter for Aperture
01/08/14 06:54 Filed in: Technology

The first option for many would be just to wait and see what happens. Apple has announced that it will update both Aperture and iPhoto to work with it’s upcoming OS release Yosemite so there really is no reason to panic just yet. You can still use Aperture and iPhoto as always and there will be some way to migrate over to the new photos app in early 2015. If everything is working well for you in either program then you can stay put and see what happens.
For others who may be more on the pro or semi-pro level there may be some anxiety about how well this migration will work for them. Apple has had a history with pro apps of cutting features to make the transition happening and then slowly adding features back in. If you rely on Aperture for your business or you do a lot of editing you may want to consider other options instead of waiting to see what Apple may do. If you have been on the fence anyway this may be the time to check out other options.
The difficulty in trying out new options is the problem of library conversions. It is usually a pain to convert an entire library away from one proprietary system to another only to wonder if you will be converting back some day. Eventually everyone will convert to a new system at some time in their lives as software comes and goes so knowing there is a solution to help you make this transition so you can get all of your work out of a system is important.
Exporter for Aperture is a great application for helping you get all of your work out of Aperture without taking a lot of time doing it. This application allows you to customize a few things in deciding how you want your library converted and then does all of the work of moving your photos out of your Aperture library with all of your metadata baked in. Not only will it preserve your metadata, it will also export any of the photos you have made adjustments to as either JPEG or TIFF with those adjustments baked into the photo. It will do all of this without touching your existing Aperture library so you can test other photo management systems and still have your Aperture library in tact. So the only thing you would lose in the process is the actual slider location for your adjustments. Everything else gets exported and ready to import into another application like Lightroom.
In this screencast I show you how to use Exporter for Aperture step by step. I cover all of the settings and show you what it looks like to go through the export process. This really is an excellent application and well worth the $14.99 for all of the time and headache it saves you.
Leave a comment below or on my Youtube Channel and let me know what you are doing with your Aperture or iPhoto libraries. If you have any questions along the way feel free to leave them in either place and I will do my best to get back to.
Photo of the Month
31/07/14 06:15 Filed in: Photography
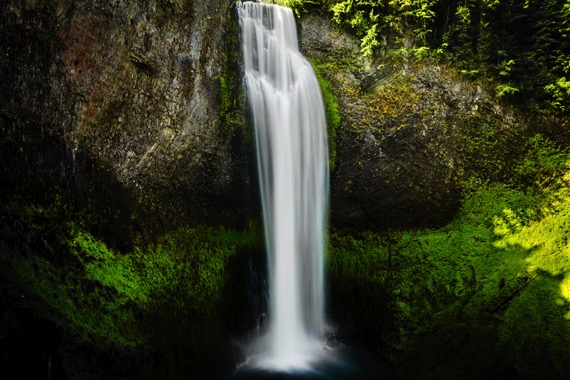
This summer we spent part of our vacation in Oregon. One of the things I love to do is hunt out one of the numerous waterfalls that seem to be everywhere in the state to shoot some long exposure photographs. There is something about sitting in front of a waterfall and taking it all in while snapping shots from my camera!
This year I got to go to Salt Creek Falls which is just north of Crater Lake. This fall is located just off of the freeway and has a very well maintained observation deck and trails around the waterfall itself. Salt Creek Falls is one of the tallest waterfalls in Oregon and is quite impressive from the top due to it’s height. I took the switch back trail which was very nicely cared for down to the base of the falls to capture this shot. The mist from the fall made it tricky to keep the lens dry and I had to quickly cover my lens in-between shots. I used my Marumi CPL and ND8 filters to capture the water and tame the light on the right side of the photo. This really is an incredible waterfall and the “S” formed in the top of the falls almost makes you think that is where it got it’s name of Salt Creek Falls.
If you are ever in southern Oregon be sure to make the trip and stop by this waterfall. As you will see when I post some shots from the top, it is an incredible place to stop!
Everpix Part 1: Mac Set Up & Web Interface
06/09/13 13:18 Filed in: Technology

In this screencast I walk you through the set up of Everpix. I also cover the web interface and walk you through the various options for viewing and sharing your photos. If you would like to try Everpix and would like an extra 6 months of photo viewing on the service you can use my link here (of course I get 6 months as well
Photo of the Week
08/09/13 13:01 Filed in: Photography
This week I thought I would share one of my favorite landscape subjects that is waterfalls. I love taking photos of moving water. Slowing the shutter speed to get that silky smooth water effect really makes the photo pop. This photo was taken north of Crater Lake off on North Umpqua Highway. The falls is called Toketee Falls and is one of the more visited falls in Southern Oregon. It is a short hike to get to this falls but the hike does include a lot of climbing up the well curated trail that includes rock steps and ends in a an observation deck just above the falls. There are some who have ventured to the bottom of the falls but the climb down and back up is not something to attempt without help around.
For this shot I used my Tamron 17-50 lens and used my Marumi CPL and my Marumi ND Filter to allow for a longer exposure. I was fortunate that the light was very even as we got there in the morning before the sun came up on the falls itself. For those who want specifics here are the settings on my camera for this shot:
Camera: Canon Rebel Xsi
Lens: Tamron 17-50
Focal Length: 17mm
Shutter Speed: 4 sec.
Aperture: f/32
ISO: 125
Photo of the Week: Out of the Deep
15/08/13 08:55 Filed in: Photography
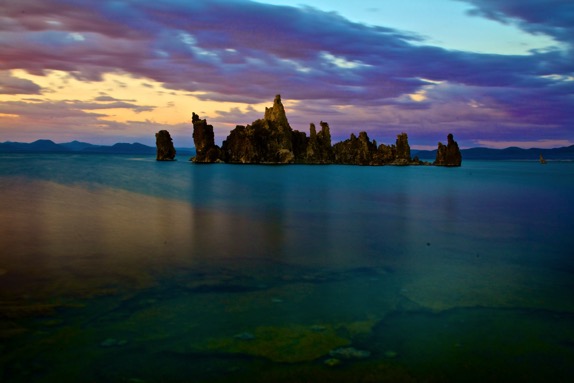
One of my hobbies is photography. I love to take landscapes which I share some of the better ones here on my website and in other places like 500px. I thought I would start to do a Photo of the Week and highlight some of my favorites. I probably won’t do one every week but will post from time to time. Enjoy!
On vacation this summer I finally got the chance to visit Mono Lake and all the tufa formations on the south of the lake. I took a bunch of photos I will upload over time. This one I took at dusk just as the colors started to change in the sunset. Because of the color in the lake and the sky I got this awesome combination of colors. I used my Marumi ND and CPL together for this 30 second exposure.
On vacation this summer I finally got the chance to visit Mono Lake and all the tufa formations on the south of the lake. I took a bunch of photos I will upload over time. This one I took at dusk just as the colors started to change in the sunset. Because of the color in the lake and the sky I got this awesome combination of colors. I used my Marumi ND and CPL together for this 30 second exposure.