
My New SmugMug Portolio Site
So over the weekend I put together my Portfolio website with all of my latest photos. Now when you click the gallery link you will be taken to my new SmugMug Gallery and will be able to browse all my latest photos. I hope to spend more time capturing my favorite subject: landscapes.
You can view my new site HERE.
I hope you enjoy all the photos! Let me know what you think when you get a chance to check them out!
OS X Yosemite Server Part 7: SSL Certificates

SSL verifies that you are who you say your are or that the server you are trying to contact is the server you think it is so you don’t end up connecting to a spoofed site that then steals your information. There are two types of SSL Certificates in terms of verifying identity. There is a self signed certificate where the user is vouching for him/herself and a verified certificate where a third party is verifying the identity of the service you are looking to connect with. Obviously the verified SSL Certificate is more trusted than a self signed one. If you try to connect to a site that has signed it’s own certificate you will get a warning that that is the case while a verified certificate will go through without a warning since it is trusted. For your own website you really don’t need a verified SSL Certificate because you know who you are. If you are hosting a site that third parties will visit, you will want to have a purchased one.
In this screencast tutorial I cover the Certificates Service built into OS X Server. I cover what SSL certificates do, the differences between self-signed & verified certificates, how to secure your services with SSL, the different types of certificates you can create in OS X Server, and how to purchase and set up a third party verified SSL certificate. If you have any questions or comments, feel free to leave them here or on my Youtube Channel.


OS X Yosemite Server Part 6: DNS
In OS X Server everything hinges on properly set up DNS. If you have a problem with your DNS then most of your services will not function properly and you will have all kinds of issues. If your DNS is not set up properly and you set up and Open Directory based on that DNS you will most likely have to start over with your Open Directory once you get your DNS set up properly, so you will want to make sure you have it working before you set up the rest of your server’s services.
In this screencast I cover how to set up the DNS service in OS X Server 4. I cover how DNS works, what each of the DNS records do, walk through two ways to set up your DNS, and cover how to test your DNS to make sure it is working properly. If you have any questions or comments, feel free to leave them here or on my Youtube Channel.
OS X Yosemite Server Part 5: Host Name and Server Settings
If you have any questions or comments, feel free to leave them here or on my Youtube Channel.
OS X Yosemite Server Part 4: Port Forwarding
When you forward a port you are creating the door for the service to go through as long as the user of that service knows he username and password needed to go through the door. This verification serves as the key to that door and let’s authorized users to have access to that service through that port. In OS X Server, if you have an Airport Extreme Base Station or AEBS, the server software itself handles opening and closing ports. If you have a third party router you will have to look up how your router handles port forwarding and you will need to set it up manually.
In this screencast I cover how to set up port forwarding using an AEBS with OS X Server. I cover the basics of port forwarding and how it works on your network. I also cover how to set up and use port forwarding with the built in service with OS X Server and how to do it manually if you don’t have an Apple Router. If you have any questions or comments, feel free to leave them here or on my Youtube Channel.
OS X Yosemite Server Part 3: Network Configuration
Another thing you will need to do make sure your server is functioning properly is to set up a DHCP Reservation for your server. A DHCP Reservation is giving your server a permanent internal IP address so every time your server is online it will have the same IP address. This is needed because your other devices that will be connecting to your server will be looking to it for DNS and other services and if the IP address changes those devices will not be able to know what the new IP is for your server.
In this screencast I cover router considerations and how to do a basic set up of your network to make sure it is ready to work with OS X Server. If you have any questions or comments, feel free to leave them here or on my Youtube Channel.
OS X Yosemite Server Part 2: Install & Set Up
Overall the new update is a good one and Apple has done some things to polish up the server app. It does have a new look to match the changes made to the visual design found in Yosemite. It also has some little touches like the Access tab and the reachability service that make the process of determining how things are configured and if they can be reached outside your server much easier. So most of the changes are little touches here and there but you can see how Apple is slowly refining the Server app to make it more accessible.
Photo of the Month: Forgotten

OS X Yosemite Part 4: Clean Install Walkthrough
In this screencast I walk your through how to do a clean install of OS X Yosemite. I cover how to do the install from a USB Boot Installer (this is something I covered in the previous screencast which you can view on my blog HERE) and show you screen by screen what the install looks like. One of the changes I noticed right away is the installer only runs once and then reboots right into the set up process saving time. In Mavericks the installer would run through the install screen twice and then go right into the set up and seemed to take more time to run than Yosemite does.
If you have any questions or comments, feel free to leave them below or on my Youtube Channel.
OS X Yosemite Part 3: Creating a USB Installer
While this process is convenient it can take some time as you still have to download the installer package as a part of the installation process. Depending on your bandwidth and how many machines you need to do a clean install of, it could add to the time it takes to get the job done.
With a bootable USB installer, you can download OS X once, create the installer and then use that USB drive to boot each of your machines into the OS X installer. OS X is only downloaded once to create the installer and you can take that USB drive with you from machine to machine. It really can make the installation process fast and convenient.
In this screencast, I cover two ways to create a USB Installer, one using Diskmaker X and the other using the terminal process for ‘createinstallmedia.’ Both of these options create a bootable installer that you can use to do a clean install of OS X. If you have any questions or comments, feel free to leave them below or on my Youtube Channel.
Talking to Your Spouse About Finances

Start with You
When it comes to talking about money, it is important to have a handle on your own triggers, goals, and ideas on how to manage it. Before you talk to your spouse about money ask yourself: How do I feel about budgeting our money? What things do I typically spend money on that I could eliminate if need be? What are my goals for our money? Are those goals realistic? Or, are those goals built around my own agenda for what I want?
Consider Your Spouse
Once you have had a chance to wrestle down your own thoughts and feelings about money, it is important to begin to think about your spouse and how he/she views money. Does your spouse share your views on money? In what ways would my money habits cause my spouse anxiety? How good of a job do you do of communicating about money to each other? Where would my spouse say I mishandle our money? The more you understand where your spouse is coming from the better your conversation about money will be. Like other areas of your marriage, understanding your spouses perspective will go a long way to avoiding blow ups and conflict when it comes to discussing money.
Sit Down and Talk Together
Once you have both prepared yourselves by understanding your own views on money and what you think your spouses’ views are, set aside some time to talk about your finances together. Start with a word of prayer together to set the tone for your discussion. Invite the Lord into your conversation and pray for His wisdom on how you handle your finances. Then begin to talk about your finances together. As you discuss these things do the following:
1. This is not a business negotiation: Don’t treat your spouse as an opponent to out negotiate to get what you want. Instead, you need to see your spouse as a partner who has an equal share in what you do with your finances.
2. Come with what you will give up: Instead of defending your spending habits, each of you come with things you are willing to give or cut back for the sake of the budget. That will keep either of you from digging in and not compromising together.
3. Keep the good of the family in the long run ahead of what you might not get in the short run: This is about planning for your future together which means some sacrifice is inevitable.
4. Remember to honor your spouse in the conversation: This discussion is about your future together. Don’t belittle or dishonor your spouse in the process of having this conversation. If at any time you find that you are getting mad at each other or going to name calling, quit and come back to it later. If you feel you can’t over come your impasse, ask for help from a mentor couple or someone at your church. You never want money to become an issue that comes between you.
Talking about money can be difficult but it can also be a bonding experience if you are willing to hang in there and see it as an opportunity to get on the same page and have the same goals together. There will always be times where you will not agree 100% but how you handle those times of disagreement could help you grow closer together.
OS X Yosemite Part 2: Handoff on All Your Macs
But like any new set of features there is a cutoff on what devices can use the features. Handoff needs bluetooth 4.0 to function so any device that doesn’t have that version of bluetooth is left out. Also, Apple chose to leave out some of it’s older Macs that do have bluetooth 4.0 like the mid 2011 Mac Mini that I use for my server. This is frustrating because my Mac Mini has everything it needs to make Handoff work. So I went on a search to see if I could work around that requirement and found a tool that enables continuity on older Macs, even those that don’t currently have bluetooth 4.0 but could add it with a card or USB device.
The Continuity Activation Tool was created by a group over on Github and you can read more about it HERE. The tool basically changes Apple’s system check and changes the no to using continuity to a yes. It is a simple to use tool and very easy to run. Just download the zip and run the tool. On their Github page, they let you know what Macs it works on and what is needed to make it run on each Mac.
In this screencast I walk through using the tool to enable handoff. I also cover how to use handoff on your Mac and show how each function works. As always thanks for watching! If you have any questions feel free to leave them here or on my Youtube Channel.
OS X Yosmite Server Part 1: Server Upgrade
In this screencast I walk you through the upgrade and give you a basic tour of some of the more obvious changes to OS X Server. I will walk through each of the services like I normally do to help you to get your server configured the way you want it.
If you have any questions, feel free to leave a comment below or on my Youtube Channel.
OS X Yosemite Part 1: Upgrade Step by Step
Overall, I found the upgrade process to go smoothly. I did experience that the time was off by about 20 minutes each time overall and the when it says less than a minute left it means more like 5 minutes or so. But using the new operating system has been smooth and I haven’t experienced any major bugs with this release like I did with Mavericks.
If you have any questions or issues feel free to share them below or on my Youtube Channel.
Photo of the Week: Abandoned Engine
If you choose to go to Bodie you do need to be aware that the last 3 miles or so in are on a pitted road which is a combination of rocks and dirt. So be prepared to go slow and proceed with caution especially if you are driving in a car that is low to the ground as you might bottom out. I saw a number of cars low to ground take the road way too fast and based on the noise I am sure they at least scratched up the under carriage.
On the day we went we were lucky enough to have incredible clouds that day. Because of the historical nature of the subjects at Bodie it is a great spot to experiment with black and white photography. In this photo I was able to capture an abandoned engine. The detail in the cast metal was incredible to view and in combination with the landscape and clouds along with an angled perspective really set this shot off. I used a CPL to pull out more in the sky.
If you are interested in purchasing prints or license this shot, feel free to email me. Let me know what you think in the comments below.

iOS 8 Tips & Set Up: Health Kit
One app I have been trying out lately on the health side is Motion X 24/7. This application tracks your sleep patterns, steps, pulse, and other medical data. What I like about the app is that it can track your sleep patterns without the need for a separate bracelet. Just leave the phone on the bed next to you or on your pillow and it gives a detailed analysis of your sleep patterns including recording moments when it hears noise to see if you are snoring. This app integrates nicely with Health Kit as you will see in the tutorial below.
In this screencast tutorial I walk through the new Health Kit feature that is built into iOS 8. I walk through how to set up a Medical ID for emergency situations, how to enter your health data, how to give other health applications access to health kit so they can share your health data, how to track that data on a personalized dashboard, and how to export your data so your doctor can review it.
As always thanks for all of your support! If you find this tutorial helpful please subscribe, like, favorite and share it so others can find it on the internet. If you have any questions or comments feel free to leave them below or on my Youtube Channel and I'll do my best to get back to you.
iOS 8 Tips & Set Up: 1Password & Sharing Service
Well with iOS 8 Apple introduced a new sharing service that allows developers to add services to the sharing menus so they can communicate across applications. One of the applications that really needed this ability was 1Password. 1Password is an application that stores all of your passwords and other confidential information in a secure file that can only be unlocked with your one password that you set up. 1Password solves the problem of remembering all of your passwords or using the same password everywhere so you can remember it which is very insecure, by allow you to only have to remember the one password it takes to open your password vault and then automatically filling in your passwords for you. It is one of the applications I install first on all of my Macs and now with the new updates to iOS 8 will be the first one I install on iOS devices as well.
1Password has an extension that allows you to click a button, type in your one password and it will pre fill all of your login information for you for whatever site you are on. Prior to iOS 8, you had to access 1Password and used its built in web browser to get the same functionality you got on your Mac with Safari. It was a work around and a pain in that you could be in Safari on your iPad and then go to a site with a password and then have to go to one password and use it’s browser to log in (or you could copy the password from 1Password and then go back to Safari and paste it in). This made it difficult to use all of the power and convenience of 1Password on iOS. Now with the new sharing feature, you can use Safari in iOS and click the share button, 1Password, and then type your 1Password and have it fill in your login information for you. Just like it works on the Mac! Also, if you have Touch ID you don’t even have to use your password as you can use your finger print to login!
In this screencast I walk you through how to set up and use 1Password on iOS 8, I also cover some of the built in features of the sharing service and show how that might work with other applications. If you have any questions or comments, feel free to leave them here or on my Youtube Channel.
Remembering to Look Back

In the Old Testament times, the Israelites where constantly forgetting the things God told them. Rather than trusting God and serving him, they had to create their own idols and look for other sources of security outside of him. They relied on Egypt instead of God. They forgot all the incredible things God did for them and ended up doing what was evil in God’s sight. God was constantly sending prophets to remind the people to remember but they refused to do so, instead looking to a future that they hoped they could control. So God took away all of their security, causing Egypt to fall and then their own world and security to crumble around them to the point where they were captives in a foreign land.
Peter and the disciples also forgot the call Jesus had put on their lives. Instead of going out and spreading the gospel, they chose to go back to fishing. Jesus appeared to them on the seashore and asked Peter three times if he loved him. Three times he told him to feed his sheep. Jesus was reminding Peter of the call he had placed on his life.
I think about how little I spend in reflecting. I do reflect in these journals and at times when things are going a little crazy, but I know I need to do it more often. Reflecting grounds you in the reality of what you are experiencing now. It lets you know if you have been on this road you are on now and reminds you of how to navigate it so you don’t go off into a ditch. Looking back shows you how far you have come when all you can see is how far you need to go. It shows you a track record of how God has shown up in your life and becomes the antidote to worry and anxiety. Looking back is a vital part of keeping our memory of events fresh and keeps us going in the right direction.
Lord, thank you for the way you have guided me in my life. I look back and see your hand on my life every step of the way. I know I forget often and end up retracing steps I have already had. Please continue to bring me back to yourself and give me the memory I need to look back, reflect, and focus on where I am going based on what I know from the past. Amen.
Photo of the Month: Fall to the Valley

iOS 8 Tips & Set Up: Family Sharing
Family Sharing allows you to link up to 5 iCloud accounts together in what is called a Family. This family allows each user to have his/her own iCloud accounts but links them together into a family where they have a shared family calendar, a shared family photo share, shared iTunes account to allow for shared apps, and certain restrictions that allows the primary account holder to approve an iTunes purchase and allows for the set up of accounts for children under the age of 13.
In this screencast I cover how to set up family sharing. I also cover all of the settings and walk you through all of the options and each step along the way in setting up your own personal family share. Be aware that you can only set up two family shares a year so if you make a mistake and delete a family, you can only add one more. If you added someone by mistake it is better to delete that person and keep the family share instead of deleting the family completely. Also be aware that children under the age of 13 that are added cannot be deleted and only transferred to another family share.
If you have any questions, feel free to leave a comment here or on my Youtube Channel.
Upgrading to iOS 8: A Step by Step Walkthrough
Once you know your device is eligible, you will want to make sure you have a back up of your iOS device just in case something goes wrong with the update. You can either create a back up over the air and storing it on iCloud or by connecting your device to iTunes and storing the back up on your Mac or PC. I cover how to do this in the tutorial below.
Once you have your backup all set, you can start the update by going to Settings-General-Software Update. It may take a while to download the update and you need to make sure you have at least 5.7 GB of space on your device. If you do not, I cover how to make space for the update in the screencast below.
I found the update to take a couple of hours because I did it on launch day. You will probably be able to do so in much less time. Once you have updated your device you won’t notice much of a change on the surface but there are many innovations and improvements that will make iOS 8 a joy to work with. I’ll probably do a future screencast that goes over some of these changes.
If you have any questions, feel free to leave a comment here or on my Youtube Channel and I’ll do my best to get back to you.
Mavericks Server Part 40: Accessing Your Server Remotely

In this screencast I cover how to connect to your server using screen sharing, the server application, and other options. As always if you have any questions feel free to leave a comment here or on my Youtube Channel.
Mavericks Server Part 39: Documents 5-Working with File Shares on iOS
Documents 5 gives you the convenience and familiarity of the Finder on your iOS devices. Documents 5 will connect to your afp or smb file shares and display those files in the same folder hierarchy that you have set up on your server. From there you can open and share those files and folders with your other iOS apps. In this screencast I cover how to connect to your file shares and navigate them in Documents 5.
If you have any questions or comments feel free to leave them here or on my Youtube Channel.
Mavericks Server Part 38: Airport Adminstration
Using the service in OS X Server with an AEBS, Server automatically enters the ports you need for the services you entered. It will also open those ports without the need to restart your router so no one loses internet service and turning services on and off becomes seamless. It really is a great feature of OS X Server and is another reason to consider using an Apple router.
Not only does OS X Server control the opening and closing of ports, it also has a built in RADIUS service. RADIUS stands for Remote Authentication Dial In User Service. This basically means that instead of having your users log onto your wireless network with a general SSID and general password, they log in with their Network Accounts that you set up on your server. So the AEBS is using your Open Directory to determine whether someone is allowed to log onto your network or not. This adds an additional layer of security to your network and is especially useful in organizations where they have users coming and going and those users having the SSID and password necessitates constantly changing the password.
In this screencast I cover how to use the service built into OS X Server to manage your AEBS. I cover how to add new ports to the service for other applications that may need ports opened. I also cover how to set up and use the RADIUS service and talk about an application called Admin Tool Radius that can help you manage multiple RADIUS Networks and manually set up RADIUS if you are not using OS X Server for that service.
If you have any questions or comments feel free to leave them here or on my Youtube Channel.
Moving From Aperture Part 3: Aperture vs Lightroom

In this screencast I walk you through where things are in Lightroom for those of you coming from Aperture. I cover how each covers photo management, photo editing, and other features. Hopefully this screencast will help familiarize you with Lightroom so you can pick up where you left off.
If you have any questions or comments feel free to leave them here or on my Youtube Channel.
Moving From Aperture Part 2: Import to Lightroom 5
Adobe made waves lately with moving all of their applications to a monthly fee model instead of the traditional pay to own model of using their software. The logic is that they will be able to issue updates more frequently and it will be cheaper in the long run, especially for those who use Photoshop. One of the offerings Adobe has is a photographers bundle where you get Lightroom and Photoshop for $9.99 a month. When compared to the $149 price tag for Lightroom right now and the usual $79 upgrade price, with Photoshop thrown in, makes this a decent deal. Add in Lightroom Mobile and it seems like Adobe has put together a pretty good solution for photographers.
Lightroom 5 comes with a 30 day trial and will read the metadata that was exported through the Exporter for Aperture application which makes it easy to try out Lightroom to see if it is for you. In this tutorial I cover how to import your library into Lightroom 5. I also cover a few of the differences in how Aperture and Lightroom handle photo management. If you have any questions or comments feel free to leave them below or on my Youtube Channel.
Moving From Aperture Part 1: Exporter for Aperture

The first option for many would be just to wait and see what happens. Apple has announced that it will update both Aperture and iPhoto to work with it’s upcoming OS release Yosemite so there really is no reason to panic just yet. You can still use Aperture and iPhoto as always and there will be some way to migrate over to the new photos app in early 2015. If everything is working well for you in either program then you can stay put and see what happens.
For others who may be more on the pro or semi-pro level there may be some anxiety about how well this migration will work for them. Apple has had a history with pro apps of cutting features to make the transition happening and then slowly adding features back in. If you rely on Aperture for your business or you do a lot of editing you may want to consider other options instead of waiting to see what Apple may do. If you have been on the fence anyway this may be the time to check out other options.
The difficulty in trying out new options is the problem of library conversions. It is usually a pain to convert an entire library away from one proprietary system to another only to wonder if you will be converting back some day. Eventually everyone will convert to a new system at some time in their lives as software comes and goes so knowing there is a solution to help you make this transition so you can get all of your work out of a system is important.
Exporter for Aperture is a great application for helping you get all of your work out of Aperture without taking a lot of time doing it. This application allows you to customize a few things in deciding how you want your library converted and then does all of the work of moving your photos out of your Aperture library with all of your metadata baked in. Not only will it preserve your metadata, it will also export any of the photos you have made adjustments to as either JPEG or TIFF with those adjustments baked into the photo. It will do all of this without touching your existing Aperture library so you can test other photo management systems and still have your Aperture library in tact. So the only thing you would lose in the process is the actual slider location for your adjustments. Everything else gets exported and ready to import into another application like Lightroom.
In this screencast I show you how to use Exporter for Aperture step by step. I cover all of the settings and show you what it looks like to go through the export process. This really is an excellent application and well worth the $14.99 for all of the time and headache it saves you.
Leave a comment below or on my Youtube Channel and let me know what you are doing with your Aperture or iPhoto libraries. If you have any questions along the way feel free to leave them in either place and I will do my best to get back to.
Photo of the Month
This year I got to go to Salt Creek Falls which is just north of Crater Lake. This fall is located just off of the freeway and has a very well maintained observation deck and trails around the waterfall itself. Salt Creek Falls is one of the tallest waterfalls in Oregon and is quite impressive from the top due to it’s height. I took the switch back trail which was very nicely cared for down to the base of the falls to capture this shot. The mist from the fall made it tricky to keep the lens dry and I had to quickly cover my lens in-between shots. I used my Marumi CPL and ND8 filters to capture the water and tame the light on the right side of the photo. This really is an incredible waterfall and the “S” formed in the top of the falls almost makes you think that is where it got it’s name of Salt Creek Falls.
If you are ever in southern Oregon be sure to make the trip and stop by this waterfall. As you will see when I post some shots from the top, it is an incredible place to stop!

Mavericks Server Part 37: Server Security Part 2: Icefloor 2
A software firewall is critical to those who have front facing servers which means their servers do not sit behind any physical hardware firewall. In essence most front facing servers have all of their ports open to the whole world so you need a software firewall to close the ports you don’ want open to secure your server. IceFloor is a front end to the built in PF firewall found on OS X Server. If you are not someone who likes to work through the Terminal, IceFloor has you covered. It’s graphical interface gives you access to all of the features found in the PF Firewall and gives you a visual way to customize and configure the firewall to fit your needs. It even has a built in wizard that will walk you through the process of setting up your firewall making it easy to configure.
In this screencast I cover installation and set up, how to open the ports you need to make your services work, and walk through all of the options included in IceFloor. If you have any questions or comments feel free to leave them below or on my Youtube Channel.
Mavericks Server Part 36: Server Security Part 1
In this screencast I cover some of the basics of server security. I cover some of the security features built into OS X Server. I cover the difference between a server behind a router and front facing, how ports work, the built in firewall, Little Snitch as security for in and out connections, when to use a full software firewall, and the basic log files inside the Server App.
If you have any questions or comments feel free to leave them below or on my Youtube Channel.
Mavericks Server Part 35: Mobile Accounts
But what happens when a user has a laptop that he/she takes outside the network on a regular basis? When this happens you really can’t host their home folders on the server because they will need access to them on the outside. Yes, they could use a VPN connection to log into their network account and have access to their desktop, but the process is slow and, depending on the bandwidth, could be almost impossible (If you are considering or would like to try to access your home folders remotely without mobile accounts, see my screencast on how to do that here
To make this particular situation work, OS X Server includes the Mobile Accounts feature. Mobile accounts is a service that keeps a user’s Mac in sync with the home folders found on the server. So when the user comes into the network their computer syncs with the server. This means any work done outside your network will now be on your server making sure you never lose any data. This also means your user can still log into any computer on your network and still have access to the work he/she did while offsite.
In this screencast I cover how to set up the Mobile Accounts Service. I go over how to enable the server on OS X Server and how to get it set up on your client machines. If you have any questions or comments feel free to leave them below or on my Youtube Channel.
Mavericks Server Part 34: Xcode Server
While I am not a coder myself, I was able to walk through the process of setting up the Xcode Server and the various features built into the service. So in this screencast I cover the basics to show you how to get started with the Xcode Server. For those of you who do code, you’ll have to let me know how well it works and if it is a valuable part of your work flow. Also, if I missed anything or got anything wrong, let me know so I can pass it on to others.
If you have any questions or comments feel free to leave them below or on my Youtube Channel.
Launchbar 6 vs. Alfred 2
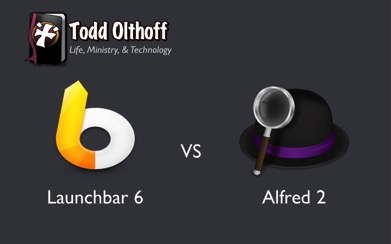
Well just a couple of weeks ago the guys over at Objective Development decided to release an update to Launchbar and introduced Launchbar 6. From the looks of it I could see that it had gotten a make over and added the larger interface I had wanted and a few new changes and tweaks to the services it could perform. So being the launcher addict that I am, I had to take a look at it. I was happy with Alfred but I couldn’t leave enough alone and now I am trying to decide which one I like best. In my quest to decide which one to go with, I made a list of features and compared them side by side. In doing this I determined that they are both very similar and capable applications. They really do overlap in a lot of ways in terms of their features but they differ when it comes to how they chose to implement some of those features.
Now I am still confused on what to do and I am still playing with both to figure out which one I will land on long term. So I decided to do a screencast to show you what I found and in the hopes that maybe it will help you decide which one is for you, or at least let you see what has changed with Launchbar 6. Really they are both very similar, with a few nuances which really means you can't make a bad decision either way. Both can be customized to almost match each other's features so it really comes down to what you want built in and what you want to customize (I'm still trying to decide myself they are so close!).
I would love to know your thoughts and which launcher you landed on. Let me know what you think by leaving any questions or comments below or on my Youtube Channel.
Mavericks Server Part 33: NetInstall
In this screencast I focus on how to set up the NetInstall service in OS X Server. I cover how to create a disk image, how to customize the image to fit your needs, and how to set up and use the service once you have everything configured. If you have any questions or comments feel free to leave them below or on my Youtube Channel.
Mavericks Server Part 32: DHCP Server
In this screencast, I cover how to set up the DHCP service in OS X Server. I cover pros and cons of using OS X Server's DHCP service as compared to a router. I also cover how to set up an Airport Extreme Base Station to work with server's DHCP service, walk you through all of the settings in the DHCP service, and cover how to set up static IP reservations for the clients on your network. If you have any questions or comments feel free to leave them below or on my Youtube Channel.
Mavericks Server Part 31: FTP Server
Built into OS X Server is an FTP service that let’s you specify a folder you want to use for your uploads. The service does not allow you to specify multiple folders or to set up nested folders inside that one folder with different sets of permissions for each so if you need that kind of detail, you will have to use another method as server’s FTP service is very limited.
In this screencast, I cover how to set up the FTP Service in OS X Server. I cover how to choose an FTP folder (OS X Server only allows one), how to set the permissions for who has access, what ports to open, and how to connect to your FTP share using Terminal and an FTP Client (Forklift in this case). If you have any questions or comments feel free to leave them below or on my Youtube Channel.
Mavericks Server Part 30: Wiki Customization
If you have any questions or comments feel free to leave them below or on my Youtube Channel.
Mavericks Server Part 29: Wiki Server Set Up
In this screencast I cover how to set up OS X Server's built in Wiki Server. I cover how to set the permissions for the service and make sure your wiki content is accessible from an iOS Device. I also cover all of the features of the server including how to set up wiki's for your various work groups. If you have any questions or comments feel free to leave them below or on my Youtube Channel.
Mavericks Server Part 28: Website Server
In this screencast I cover how to configure and set up the Website Server to host your website. I cover how to set up the website service on OS X Server. I cover the built in website and it's services, what each of the settings does, how to create your own website including how to set up DNS, add your website files, and test your new website. If you have any questions or comments feel free to leave them below or on my Youtube Channel.
Mavericks Server Part 27: Mail Server
In this screencast I cover how to set up the Mail Server in OS X Server. I cover the configuration process including setting up DNS on your server and at your domain provider. I also cover all of the settings to make sure your Mail Server is configured correctly. If you have any questions or comments feel free to leave them below or on my Youtube Channel.
Mavericks Server Part 26:Caching Server
The Caching service cache’s downloads and updates from the Mac and iOS stores. It not only keeps a copy of system updates but any application or iBook you download. To have your client devices point to your server for the updates and downloads is zero configuration. The devices automatically check for a cached download and the same network and if they find that update they use the one on the server instead of downloading a new copy. Of course you need lots of space if you are storing copies of your downloads so you will need a decent sized hard drive and you can limit the size the Caching service can use to store those updates.
In this screencast I walk you through the Caching service. I help you get it up and running and show how it works and how to track the type and size of updates you have on your server.If you have any questions or comments feel free to leave them below or on my Youtube Channel.
Mac Power Users: OS X Server

If you have any questions about anything we talked about on the show, feel free to send me an email, leave a comment, or connect with me on twitter using @tolthoff.
Mavericks Server Part 25: Software Update
To help you better manage your network and make it more efficient, OS X Server has a built in Software Update Server that let’s you download the updates once and then have your users look to your server for their updates instead of all going to Apple’s Servers. It also allows you to control which updates your users have available to them. This comes in handy when an update breaks something else and you want to block your users from using that update. Because they are coming to your server for the update, you control what updates they see and can use.
In this screencast, I walk you through how to set up and manage Software Update on OS X Server. I also cover how to set up your users to point them towards your server for updates. If you have any questions or comments feel free to leave them below or on my Youtube Channel.
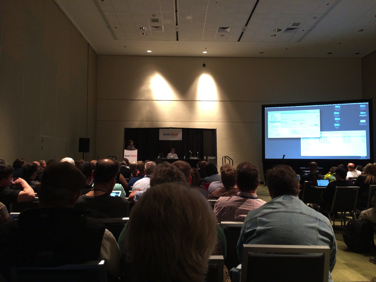
Macworld/iWorld 2014 Recap

This year I had the chance to have breakfast with the community people who work with Don McAllister on ScreenCastsOnline. Don is one of the nicest guys I have ever met and he is brilliant at content development and screencast tutorials. Everything I do with screencasts I learned from Don and I am humbled to be a part of ScreenCastsOnline and I continue to learn new things that make me a better screen caster. If you haven’t had a chance to check out ScreenCastsOnline, I highly recommend you do so as Don is the best in the business and the group of people who work with him on the ScreenCastsOnline Magazine are an incredible group of people and experts in the podcast/publishing/video community.

I also had the privilege of going to the Nosillacastaways Party hosted by Steve & Allison Sheridan from the Nosillacast and podfeet.com. It was an awesome party where I was able to meet a number of people including Chuck Joiner from MacVoices. Chuck is a great guy and I look forward to connecting with him more in the future. I also got to talk with the Nosillacastaways who couldn’t be there via a Google Plus Hang Out. You gotta love the fact that people were able to telecommute to a Mac event! Steve and Allison are incredible hosts and I really appreciated the fact that they put that event on every year. I look forward to next year!

On the show floor I met a doctor who developed a magnetic ring that lets you easily secure your iPad to your hand without worrying about dropping it called Bakbone. Hearing his story of how he developed this for the medical field and it just took off as other people wanted to use it as well. It was cool to see he was as surprised at how well it was working as anyone else. He was a really great guy and the product is great in its simplicity. You can check it out here: http://www.thebakbone.com.
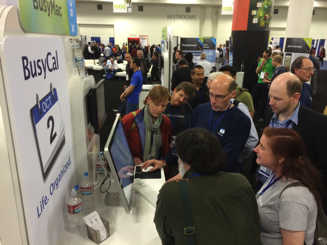
Overall, Macworld/iWorld is a great event and I look forward to attending and connecting with everyone again next year!

Mavericks Server Part 24: Profile Manager Device Management
In this screencast tutorial I cover how to manage your Mac and iOS devices using Profile Manager. I cover the information Profile Manager provides on each of your enrolled devices. Then I talk about strategies for managing your devices and go over the various settings you can push to your devices using profiles.
If you have any questions feel free to leave them below or on my Youtube Channel and I’ll do my best to get back to you.
Mavericks Server Part 23: Profile Manager Users & Groups
In this screencast tutorial I cover how to manage your users and groups using Profile Manager. I cover some strategies for when to use groups and when to use users in setting up your profiles. Then I walk you through each of the payloads that are available to customize and push to your users and groups.
If you have any questions feel free to leave them below or on my Youtube Channel and I’ll do my best to get back to you.
Mavericks Server Part 22: Profile Manager Restrictions & Settings
In this screencast I go over each of the restriction settings. I also cover the basic settings found in each of the tabs in the Profile Manager Web Interface including how to access information on each of your users and devices.
If you have any questions feel free to leave them below or on my Youtube Channel and I’ll do my best to get back to you.
Mavericks Server Part 21: Profile Manager iOS Enrollment
In this screencast I cover how to enroll your iOS devices into Profile Manager so you can manage them and push changes. I cover how to install the profiles you will need to enroll your iOS devices including the proper order you will need to install them. I also cover how to install the basic configuration profile that adds services you have previously set up like calendar, contacts, and VPN to your iOS devices.
If you have any questions feel free to leave them below or on my Youtube Channel and I’ll do my best to get back to you.
Mavericks Server Part 20: Profile Manager Mac Enrollment
In this screencast I cover how to enroll a Mac in the Profile Manager Service. I cover where to go to get the profile you need to install. I also cover the order in which to install those profiles and how to know your Mac’s have been successfully enrolled.
If you have any questions feel free to leave them below or on my Youtube Channel and I’ll do my best to get back to you.
Mavericks Server Part 19: Profile Manager Set Up
Profile Manager is designed to help you manage the settings and services your users and devices can have access to. It allows you to set up your services and permissions once and then push those changes to all of your users and devices. It really does make managing your clients a much easier process and allows you to do so remotely without having to be in front of each machine.
In this screencast I cover how to set up Profile Manager on OS X Server. I walk you through each of the settings included with the service and walk you through the set up process.
If you have any questions feel free to leave them below or on my Youtube Channel and I’ll do my best to get back to you.
Mavericks Server Part 18: Server Back Up
Backing up your server is different than the Time Machine Service built into OS X Server. The built in Time Machine Service inside OS X Server is designed to back up client machines not the server itself. You have Time Machine on the server that you can use to back your server up to a connected drive. So Time Machine is available just not through the server app. But a Time Machine back up is not going to get you up and running in a hurry so you will need other strategies to make sure you have options. In this screencast I cover a Server back up strategy that includes, incremental back ups to Time Machine, a bootable clone of your server so you can recover quickly, and strategies for backing up your Open Directory and services.
If you have any questions feel free to leave them below or on my Youtube Channel and I’ll do my best to get back to you.
Mavericks Server Part 17: Time Machine
In this screencast I cover how to set up the Time Machine Service. I also cover how to connect your users to the back up, set a limit on the size of each back up, and how to monitor your back ups to make sure they are working properly. As always, feel free to leave a comment here or on my Youtube Channel.
Mavericks Server Part 16: VPN
In this screencast I cover the VPN service built into OS X Server. I go over how to set up your VPN service, set your router to allow those connections, and cover how to set up your client machines to use VPN.
If you have any questions along the way feel free to leave a comment here or on my Youtube Channel.
Mavericks Server Part 15: Messages
Built into Maverick Server is a private messaging system called Messages. This service allows you to set up your own iMessage Server so you can have private chats with other clients on your server and the messages you create are stored on your server not in the cloud. This is great for highly confidential communications or for those who just want to make sure they know who is being communicated with for safety reason such as monitoring your kids use of iMessages.
In this screencast I cover how to set up the Messages Service. I cover all of the various settings and how to set up the client machine to use your Messages Service. I also cover how to auto set buddy lists using groups so all of your chat buddies automatically show up in your buddies list without having to add them manually.
As always if you have any questions or comments feel free to leave them here or on my Youtube Channel.
Mavericks Server Part 14: Contacts
In this screencast I cover how to set the service up. I also cover how to set up your client machines to work with your OS X Server Contacts Service. In addition I cover how to set up a joint contacts account that all of your users can use for their contacts service so everyone can share a joint contacts list. This can come in handy for couples or family that want to share their contacts in one centralized list.
If you have any questions feel free to leave a comment here or on my Youtube Channel.
What Do You Think About Your Spouse?

Over time, unaddressed conflict can lead people to begin to guess at their spouses' motives and they start to characterize their spouse by those negative views. So I might think my spouse is selfish because she always seems to want to get her way. Being selfish is not a good thing and the more and more I think about my spouse in a negative light, the more I begin to see that negative trait in her life. She asks for something that I think is unreasonable I say to myself, "See there she goes being selfish again." She balks at doing something that I feel she should drop everything to do and it further reinforces my view that she is selfish. She says she doesn't feel like Chinese food after I make the suggestion that I would like to go there and that adds another thing to back up my negative perception. If this goes on over time, pretty soon I really believe she is selfish and feel like I have a bunch of evidence to prove that is true.
Now if I choose to let my perceptions about my spouses motives guide how I view my spouse it will begin to effect my love for my spouse and my desire to connect with her. Who wants to connect with someone they think is selfish? Let this go long enough and I start to think it is a justice issue and begin to fight everything my spouse is doing and challenge her because selfish people need to be confronted and challenged on their selfishness. Why should you let a selfish person get away with their selfishness? You can see how this could lead to the unraveling of a marriage!
But what if I chose instead to give my spouse the benefit of the doubt? What if I chose to see her as the loving person I married? What if I chose to check things out before assuming the worst? How would that shape my interactions with her?
Going back to my examples above what if I ask about what I see as her unreasonable request and realize that it really isn't that unreasonable at all given the circumstances? What if I find out the reason she didn't drop everything for my request is because she already has a commitment to someone whose need is greater than mine? What if I find out she didn't want to go to Chinese not because she just wanted her way but because Chinese made her sick last time and she wants to enjoy her time with me? The list of possibilities could go on and on. The point is, when I choose to see my spouse in a positive light and give her the benefit of the doubt instead of presuming she is guilty until proven innocent, my attitude changes and the conflict in my relationship goes down because I am not picking as many fights based on my negative reaction to everything she says or does.
So how do think about your spouse? Have you allowed your attitude to change to the point where your spouse is your enemy? If so how is that guiding and tainting your responses to everything he or she does? Can your spouse do anything without you seeing the negative in it? If so you need to adjust how you view your spouse and choose to see the best instead of the worst. Watch how doing that changes your attitude and interactions with your spouse and what that does to your feelings of love and connectedness in your marriage.
Mavericks Server Part 13: Calendar
As always if you have any questions or comments feel free to leave them here or on my Youtube Channel. Thanks for all your support!
Mavericks Server Part 12: Connect & Automount AFP
In this screencast I cover how t connect to your AFP shares using a couple different methods. I also cover how to set up your shares to auto mount to your Mac at start up. As always, if you have any questions feel free to leaver them here or on my Youtube Channel.
Mavericks Server Part 11: File Sharing & Home Folders
If you have any questions feel free to leave a comment here or on my Youtube Channel.
Mavericks Server Part 10: Bind Clients to Server
In this screencast, I cover how to bind your Mac clients to your server’s Open Directory. I walk through the steps needed to perform the bind and talk about the difference between authenticated and anonymous binding. If you have any questions feel free to leave a comment below or on my Youtube Channel.
Mavericks Server Part 9: Users & Groups
In this screencast I cover how to set up your users, how to tell the difference between a network and local user and the advantages of each, and finally how to set up groups and manage your users in those groups. If you have any questions or comments, feel free to leave them here or on my Youtube Channel.